Last time we talked about Dirty Pour acrylic art. One of my favorite mediums right now. Everyone’s favorite from what it looks like on YouTube. Lol.
Dutch pour is similar in style to dirty pour but the execution is a tad different. I use a hair dryer or some drinking straws depending on the size of the canvas or the area I’m trying to enhance.
Dutch pour is not a funny drink from Amsterdam. Although I did live in Holland for a semester as an exchange student in high school they probably do have a drink called The Dutch pour. It may or may not be named after me. LOL
To get started you prepare your space just like you do as described in the dirty pour post. Set up your workspace and grab your canvas and get started.
However, for a Dutch Pour, forget the red solo cup this time and just prep your small cups with each individual color as described in my dirty pour blog.
Let’s begin with the dutch pour basics
I start by covering the entire canvas in white paint. Not a thick smear but a good even covering of the canvas. A long frosting knife works best for smoothing the paint evenly onto the canvas.
There are many techniques for adding the colors. Some people make puddles of colors over colors like targets or Kandinsky’s circle paintings.
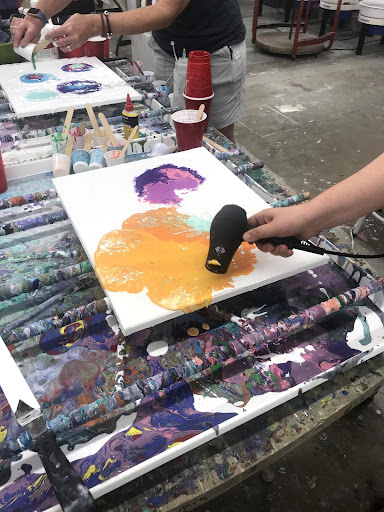
Check out his work although it’s not like this at all but still lovely. Back to the image at hand. Pour color after color in concentric circles until you have a good spread of colors and size circles. (see slide #1)
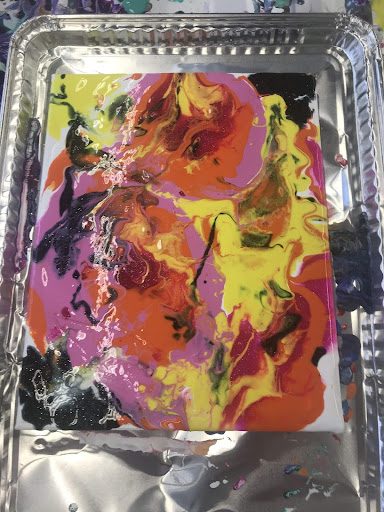
Some people pour lines of paint across the canvas like a river. As you can see in this picture I started with red, yellow, pink, purple, and blue lines down the canvas. A few tilts and slides and it was complete! (see slide #2)
Some people just go all out Jackson Pollack on it and splatter it everywhere. After you’ve got the paints down grab the hairdryer with the funnel attachment and get ready to rumble! (see slide #3)
WhateverDutch pour technique you use for pouring you’re gonna use you’ll want to place the hairdryer very close to the paints and send them moving!
Hair Dryer warning: sometimes you will accidentally hit the paint with your hairdryer. I have a separate hair dryer for my crafts and one for my hair. If you decide to get into this art form, Buy yourself a cheap one to keep in your craft room. Don’t forget the funnel attachment too! (slide #4)
I also use the cold setting on my hair dryer so the paint doesn’t dry out too quickly. Heat can make the paint dry too fast and when thick paint dries too fast it can cause cracks in your artwork. You can blow the paint in alternative directions so you get a back and forth look.
Or you can just blow it all over the canvas. Some people barely move the paint around and some cover the entire canvas with the paint and cover all the white.

this art is a chance for everyone to get creative! no excuses!
Try out several different looks to see what you like. I use the drinking straw to move smaller areas of paint around the canvas. Some people will use their mouths to blow smaller areas of paint around and be more intentional on where the colors go. You can control the movement better and it allows for a very specific shift in the colors that way. That was before COVID.
These days when I do this with my art camp kids we don’t use the straws or we go outside where there is a lot of space to spread out hot air around. lol
The image on the left was turned into the image on the right. . . dutch pour is similar to a dirty pour in that supplies are basic and should not be expensive.
As I mentioned in my dirty pour post, don’t buy your stuff on Amazon or a specialty craft store.

They tend to upcharge because they know that you’re about to do a dirty pour. I also don’t suggest buying the pre-poured mediums that they sell at the craft stores. It can be more expensive.
I have seen videos of people who literally buy all of their supplies at the dollar store and show you how they can do it on a very small budget. But the sky is literally the limit! Use your creativity to create some beautiful works of art.
You might even score some good stuff at your local Goodwill or other Second Hand Shop. We have a place in Houston called Texas Art Asylum where people donate their art supplies and you can go and buy them by the pound. It’s extremely fun to go there and also a bit dangerous for your pocketbook
However if you’re just starting out with Dutch Pout art and you just want to figure out if you’re good at it or you like it; it’s worth it to buy the pre-poured kits that they sell at Michael’s or other craft stores.
Use the pre-poured kits as an experiment to see if you are intrigued enough to continue doing it and then after that go out and buy the supplies that you need in bulk. It’ll be much cheaper and you’ll be much happier. Michaels sells their canvases online in bulk and if you match that with a 40% off coupon and you’re in good shape.

As you can see, Dutch Pour is a crazy ,messy fun art style that requires ZERO artistic talent whatsoever.
I do this particular craft activity every time I have a camp because each canvas comes out so unique that no two are alike and kids enjoy the process so much it’s totally worth doing over and over and over again!
Let’s see how creative you can get with what you Dutch Pour onto. I have Dutch poured it on wood, I have Dutch poured on serving trays, I have Dutch poured on outdoor metal tables that I then epoxied so that they are weather resistant! So many options!


